Blazor Web App

Blazor is a full-stack web UI framework that allows you to build modern front-end applications using C#, HTML, CSS and Razor. With the release of .NET 8, the “Blazor Web App” is now available, which allows you to develop apps that render content at either component or page level with interactive Server rendering and WebAssembly rendering, or even static apps. In this article, I present the Blazor Web App and the different render modes.
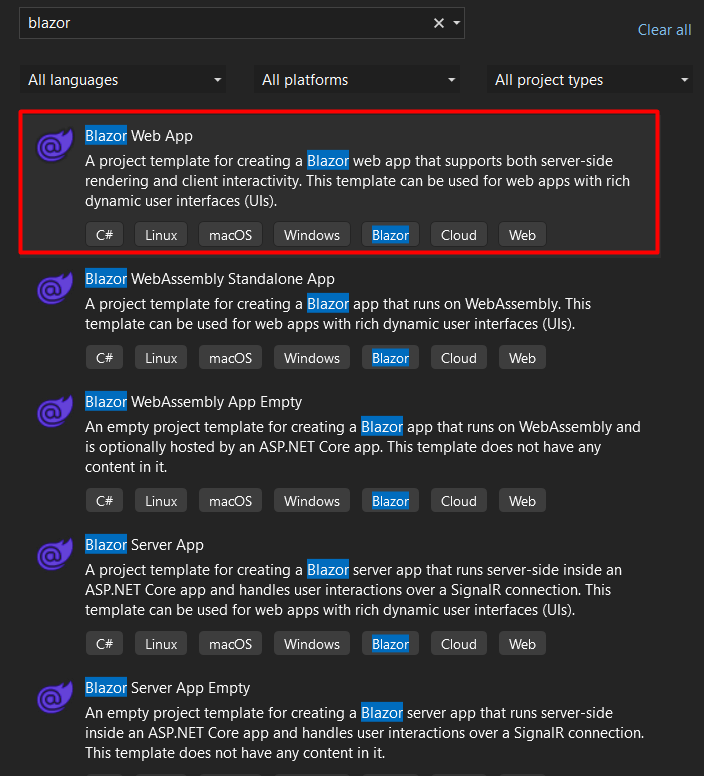
For demonstration purposes, I created a Blazor Web App using the Visual Studio 2022 Preview version. To create a Blazor Web App on VS, select the option to create a new project, search for “Blazor” and select the “Blazor Web App” template:
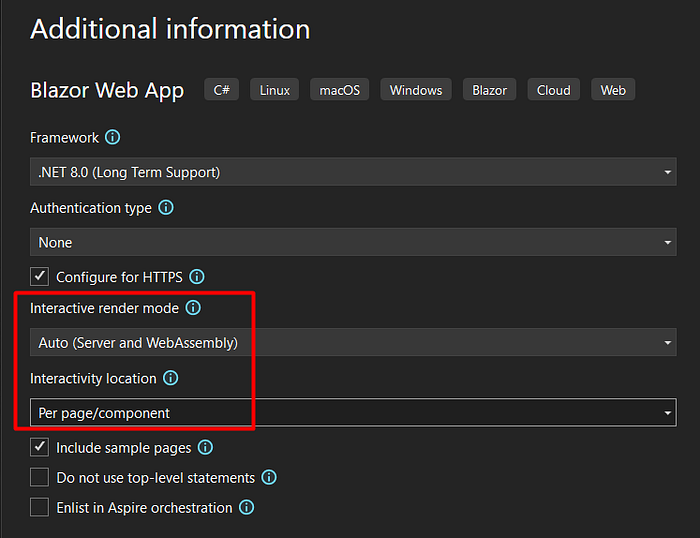
On the next step, add the project name, and click on Next. The next screen is the Additional Information. On this screen, there is a field Interactive render mode with four options. In this field, we can select the interaction type we want in our app. These are the options:

- None: this is the static server-side rendering (static SSR) option, newly introduced with .NET 8, which produces static HTML on the server. In this mode, the component is displayed without the capability for interaction between the user and .NET/C# code. JavaScript and HTML DOM events function as usual, but user events on the client side cannot be processed with .NET running on the server. In this mode, it takes HTTP requests coming in, and it replies with some HTML. For each interaction required in your application, a POST to the server becomes necessary.
- Server: this is the interactive server-side rendering (interactive SSR). In this mode, the ASP.NET Core runtime dynamically generates the final HTML markup on the server. The HTML is sent to the client over a network for display by the client’s browser. The app will be connected to the server using a WebSocket connection with SignalR, this allows the server to send the UI updates in real-time into the browser, and receive events back from the user (everything the user does locally, will go to the server and will be returned to the client). Opt for this mode when you want to generate interactive components with prerendering on the server.
- WebAssembly: this is the interactive client-side rendering (CSR) option. It generates interactive components on the client with prerendering on the server. The final HTML markup is generated by the Blazor WebAssembly runtime directly on the client, and no HTML for the app’s client-generated UI is sent from a server to the client for this type of rendering.
- Auto (Server and WebAssembly): this includes both interactive types: Server and WebAssembly. With Interactive Auto (automatic) rendering, it initially uses the server-side ASP.NET Core runtime for content rendering and interactivity. Following the download of the Blazor bundle and activation of the WebAssembly runtime on the client, subsequent rendering and interactivity are handled by the .NET WebAssembly runtime. Typically, Interactive Auto rendering ensures the swiftest app startup experience.
Interactivity Location
In this option, you can set the configuration to render the components on the server or on the client, defining it per page/component or defining a global configuration:
- Per page/component: it sets the rendering configuration to be defined per page/component.
- Global: it sets a global rendering configuration for the whole app.
For this example, I selected Auto (Server and WebAssembly) and Per page/component:
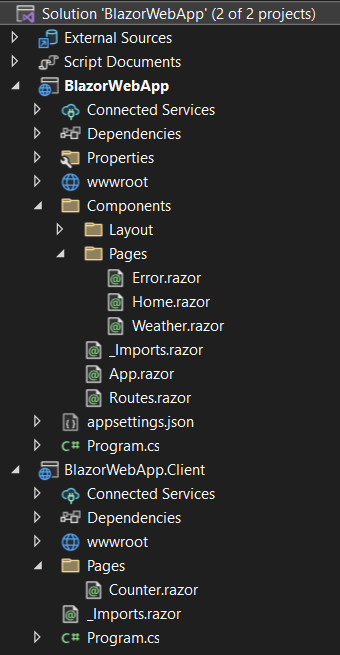
As I selected the Auto option in the Interactive render mode, the solution is created with these two projects and the following pages:
- BlazorWebApp: a Blazor Server project, which is the project that runs on the server, and handles all the requests.
- BlazorWebApp.Client: a Blazor Web Assembly project, which is the project that will run on the client side (on the browser on WASM).
If you choose the Server on the Interactive render mode, you will have a single project, and if you choose WebAssembly, you will also have two projects.
On the Program.cs file of the server project, you can find the register of all the services that are required to render Blazor components from the server and the new interactive render modes:
builder.Services.AddRazorComponents()
  .AddInteractiveServerComponents()
.AddInteractiveWebAssemblyComponents();- The
AddInteractiveServerComponentsadds support for rendering interactive components on the server side (Interactive Server components). - The
AddInteractiveWebAssemblyComponentsadds support for rendering interactive components on the client side (Interactive WebAssembly components).
On the configuration below, it’s being set the Blazor components to be routable endpoints using ASP.NET Core endpoints routing.
There is also this configuration:
app.MapRazorComponents<App>()
  .AddInteractiveServerRenderMode()
  .AddInteractiveWebAssemblyRenderMode()
.AddAdditionalAssemblies(typeof(Counter).Assembly);- The
MapRazorComponentsdiscovers available components and specifies the root component for the app (the first component loaded), which by default is theAppcomponent (App.razor). Here it sets the Blazor components to be routable endpoints using ASP.NET Core endpoints routing. - The
AddInteractiveServerRenderModeconfigures interactive server-side rendering (interactive SSR) for the app. - The
AddInteractiveWebAssemblyRenderModeconfigures the Interactive WebAssembly render mode for the app. - The
AddAdditionalAssembliesdiscovers routable components in additional assemblies.
Because this is a Web App project with the Auto interactive render mode, it’s possible to include interaction with both Server and WebAssemby. If you create a Server-side app or a Client-side app, you can not include the reference to the other rendering option (Server-side app only supports server-side, and Client-side app only supports client-side).
Render modes
There are three different render modes that you can set to your components:
- InteractiveServer: renders interactively on the server via Blazor Server hosting with server-side prerendering.
- InteractiveWebAssembly: renders interactively on the client via Blazor WebAssembly hosting with server-side prerendering.
- InteractiveAuto: it determines how to render the component at runtime. The Web Assembly (WASM) is the most performatic option, but during the first load, it takes longer because it is necessary to download the runtime on the client browser. So the component is initially rendered with interactive server-side rendering (because it’s faster than waiting for the download of the files that are downloaded on the first time) using the Blazor Server hosting model. Simultaneously, the .NET runtime and app bundle are downloaded to the client in the background and cached so that they can be used on future visits. Once these files are downloaded, it will always execute this component in the WASM format. All components using the automatic render mode, must be built from a separate client project that sets up the Blazor WebAssembly host.
Render modes propagate down the component hierarchy, and you can not switch to a different interactive render mode in a child component. For example, a Server component can not be a child of a WebAssembly component.
Render Mode StreamRendering — Weather Component
On the Server-side project, there is the Weather component. This component contains a table with weather forecast data. This component has the @attribute set to [StreamRendering]:
@page "/weather"
@attribute [StreamRendering]
<PageTitle>Weather</PageTitle>
<h1>Weather</h1>
<p>This component demonstrates showing data.</p>
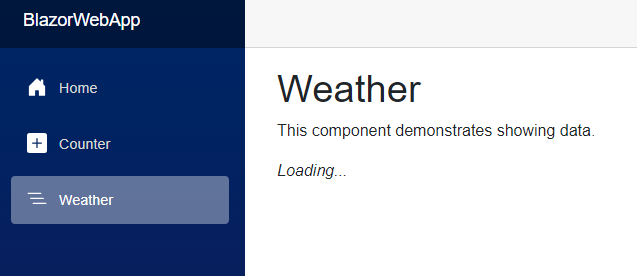
// ...The StreamRendering attribute, allows you to render the page before you have even loaded the data that needs to go to the component. It is then possible to render the initial HTML straight away, and then stream updates into it, when the data become available. It renders the page on the server-side, and stream the data to the client browser. When the data is ready, it will update the content on the page. For example, on the initial access you will see this (on the @code part of the component, there is a delay configured to simulate asynchronous loading to demonstrate streaming rendering):
And after a few seconds, it will show the data:
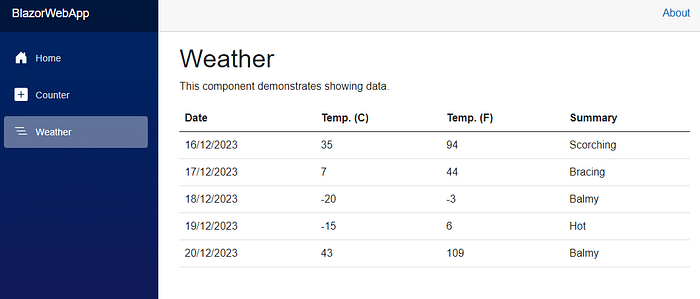
Note that the HTML was rendered and returned, even before the data was even ready to be displayed. This allows fast initial UI render/update.
Render Mode Auto — Counter Component
On the Client project, there is the Counter component. This is a simple component that contains a button, to sum one each time you click on it. This component has the rendermode (used to specify the render mode for a component) set to InteractiveAuto:
@page "/counter"
@rendermode InteractiveAuto
<PageTitle>Counter</PageTitle>
<h1>Counter</h1>
<p role="status">Current count: @currentCount</p>
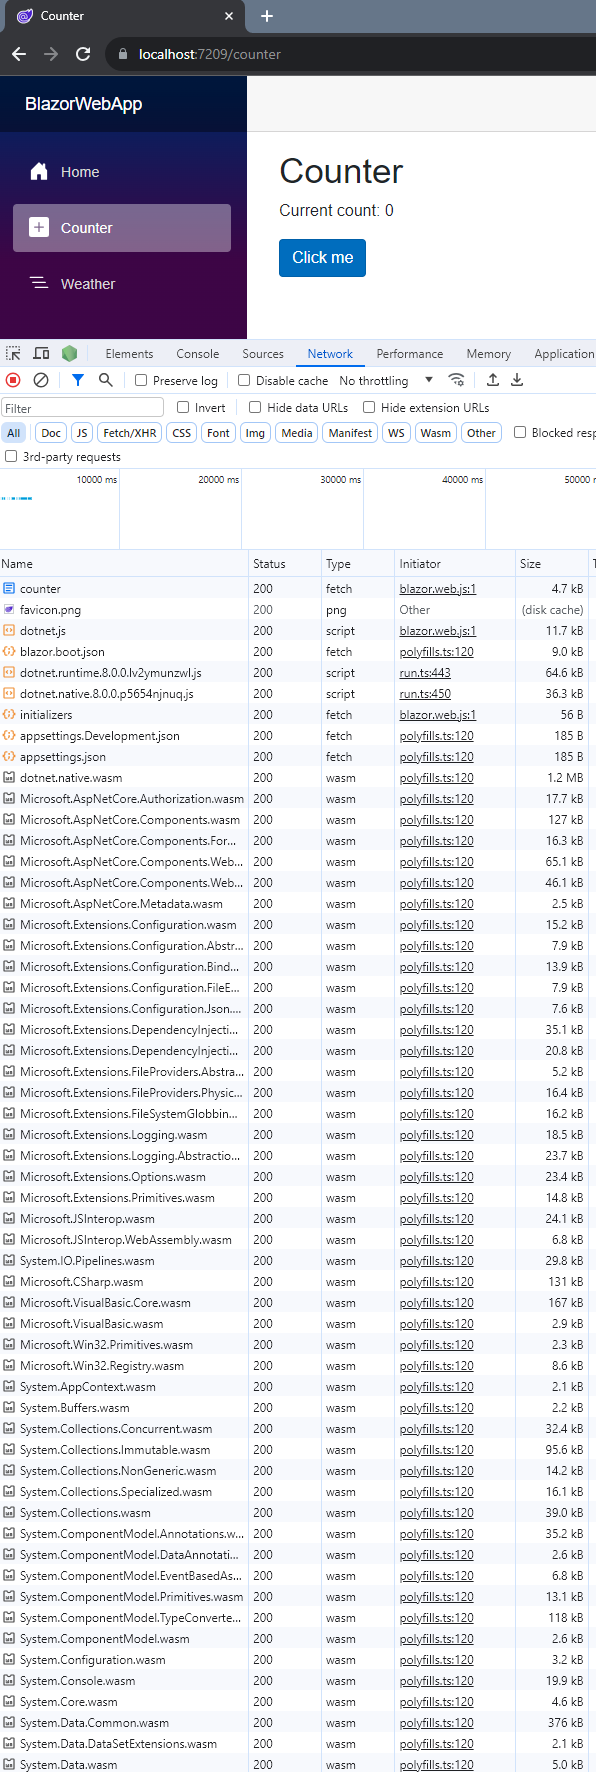
// ...If you run the app, open the Network tab in the browser, and go to the Counter page, you can see that on the first time you access the Counter component, a lot of files are downloaded:
But now that these files have been downloaded, you can access again the same component and these files will not be downloaded anymore:
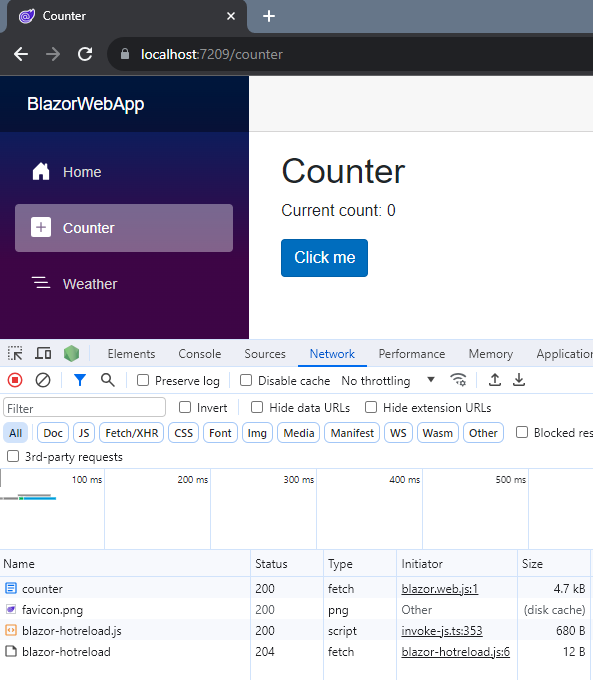
The reason for this is that on the first time that the user accesses the page, it downloads the .NET runtime and the necessary files to run the component on the client side with WASM, and after that, the files will be already on the client side.
Conclusion
Blazor Web App introduces this new possibility to have components that render on the server and the client side. This brings a big benefit when the user is loading the page for the first time, as this page will be rendered on the server side while the necessary files to run on the client side are being downloaded. After the files are on the client browser, the components will be run with WASM.
This is the link for the project in GitHub: https://github.com/henriquesd/BlazorWebAppDemo
If you like this project, I kindly ask you to give a ⭐️ in the repository.
Thanks for reading!